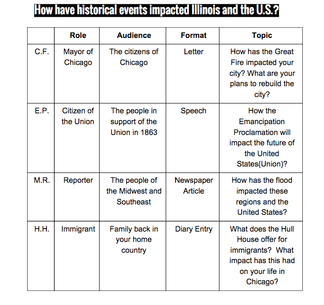
 I have tried recording presentations in the past from my iPad and the volume was not always audible, which made it hard for any serious viewing reasons. This time, I tried using my iPhone. I gave it a practice round with a group and the phone seemed to pick up each of their voices well enough. I figured now, if students miss any of the presentations they will be able to view the recording that I made, and another benefit is that I don’t need to scramble and try to miraculously grade these group presentations while they are presenting. This way I can rewatch the videos and assess each person individually. I feel like this was going to give me much more accurate evaluations on their speaking and presenting. Once I had all the groups present and I recorded them, I uploaded them into my Google Drive. From there, I decided I would post these videos onto Google Classroom. I also realized that any of the students would benefit from going back and watching these videos. After all, their writing assignment is requiring them to use the factual information from the presentations to write their RAFT piece. 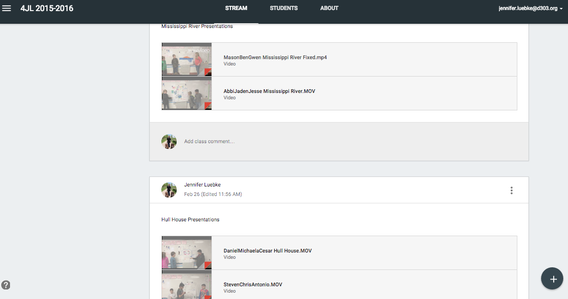 As you can see, I attached each of the presentations to Google Classroom. When I presented this RAFT tasks to the students they were so excited and I was so happy to see them jumping into this task with a positive attitude. When they we released to begin, so many more students revisited the presentations to review the information in their notes!
This makes me wonder, what other things can I easily record and give access to my students?!
0 Comments
 Hi! Elizabeth here. I’m excited to share with you a favorite, and a Google Original. I created one of my favorite Google uses myself. Since it is one of the most tools that has streamlined my classroom I thought I would share it with you! 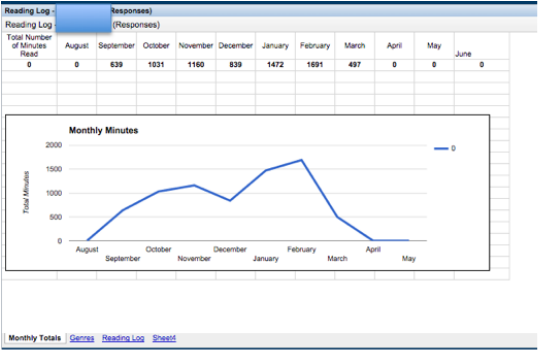 The sites also track the number of books they have read in each genre. This is not something that I was not able to track when I used paper copies. I also love that students can compare their monthly minutes to previous weeks. Interested in setting up a Google Reading Log in your classroom? Watch these tutorial to learn how. |

 | One thing I have always struggled with is holding students accountable for their reading. I have tried everything from reading response journals, paper reading logs, Notice and Note Signpost notebook. However, none of it was motivating my students to keep reading or even enjoy it. |
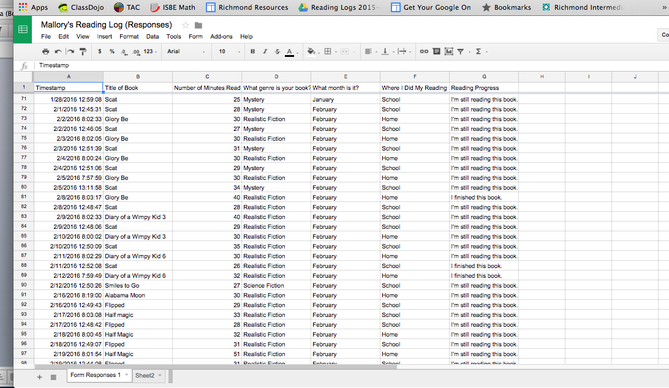
Last year, Elizabeth, my amazing, techy, colleague created an electronic reading log. This was done by having the students enter specific information about their book/reading time through a Google Form. Below you can see an example.

Once students complete an individual form, that was created specifically for them, the information is then transferred into a Google Spreadsheet. Students have “view” access only on this spreadsheet. On the first tab, it shows all of the students entries. On the second tab, it has a breakdown for each of the months and it calculates the total amount of minutes read in that month. Once we created each students personal reading log form and responses spreadsheet, we created a Google Site to have all of this information easily accessible by me and the students.
Given that at Richmond each student has their own personal tablet, they each have their reading log form and personal page on the Google site saved to their home screen. This is beneficial because the students have routines built in to the day and are to record their previous night’s reading in the morning and then the in-school independent reading done each afternoon, essentially adding to 60 minutes a day.
At the beginning of the year, students were really tracking this for themselves and I could potentially look at students reading logs to determine whether or not they were doing their reading. I would get a lot of “I forgot’s.” when I would look at the logs, so I got another great idea from Elizabeth and that was her monthly reading challenges that she would do to motivate her kids to read. This was not going to take much effort on my part, but it would hopefully get students more excited about reading and encourage them to read more than just the 60 minutes a day. February was the first month that I tried this.
How it works:
Note: It was not expected that all students would hit the 1,200 minutes, however, if other students read more than the 1,200 minute goal, they would recover the minutes lost by those classmates.
Every Friday, I would touch base with the kids and enter their minutes into a spreadsheet to see if they met their weekly goal (300 minutes). I did not communicate this information home, however, it may be something that I would consider for the future.
After the first month, I was so happy to see the amount of students that were excited to read and track their minutes. I had parents also informing me that they were noticing the difference at home.
As a reward, students earned one reward, lunch date with Mrs. Luebke and a sweet treat, if they met the 1,200 minutes. Then, as a class we met the 32,400 minutes goal, so we celebrated with dressing up as a book character for the day.
Update: I have had to IEP meetings in the last week and I have had 2 parents say that they have seen an increase in engagement with their reading at home! Woohoo!
At the beginning of the year, students were really tracking this for themselves and I could potentially look at students reading logs to determine whether or not they were doing their reading. I would get a lot of “I forgot’s.” when I would look at the logs, so I got another great idea from Elizabeth and that was her monthly reading challenges that she would do to motivate her kids to read. This was not going to take much effort on my part, but it would hopefully get students more excited about reading and encourage them to read more than just the 60 minutes a day. February was the first month that I tried this.
How it works:
- Determine the amount of minutes each student will be expected to read.
- I did this by counting the number of school days in February. Then, multiplying that times 60 minutes a day (30 mins at school and 30 minutes at night). For this month, students were going to be held accountable for 300 minutes.
- I did this by counting the number of school days in February. Then, multiplying that times 60 minutes a day (30 mins at school and 30 minutes at night). For this month, students were going to be held accountable for 300 minutes.
- Determine the class goal for minutes read.
- I did this by multiplying the 300 minutes by the amount of students I have in my class (27). The class was expected to read a total of 32,400 minutes.
- I did this by multiplying the 300 minutes by the amount of students I have in my class (27). The class was expected to read a total of 32,400 minutes.
- Students determined rewards
- If students met the 1,200 minutes for the month, they would get a lunch date with me in the classroom and then I would provide a treat.
- If the class meets 32,400 minutes, then we will all be able to dress up as our favorite book character.
- If students met the 1,200 minutes for the month, they would get a lunch date with me in the classroom and then I would provide a treat.
Note: It was not expected that all students would hit the 1,200 minutes, however, if other students read more than the 1,200 minute goal, they would recover the minutes lost by those classmates.
Every Friday, I would touch base with the kids and enter their minutes into a spreadsheet to see if they met their weekly goal (300 minutes). I did not communicate this information home, however, it may be something that I would consider for the future.
After the first month, I was so happy to see the amount of students that were excited to read and track their minutes. I had parents also informing me that they were noticing the difference at home.
As a reward, students earned one reward, lunch date with Mrs. Luebke and a sweet treat, if they met the 1,200 minutes. Then, as a class we met the 32,400 minutes goal, so we celebrated with dressing up as a book character for the day.
Update: I have had to IEP meetings in the last week and I have had 2 parents say that they have seen an increase in engagement with their reading at home! Woohoo!
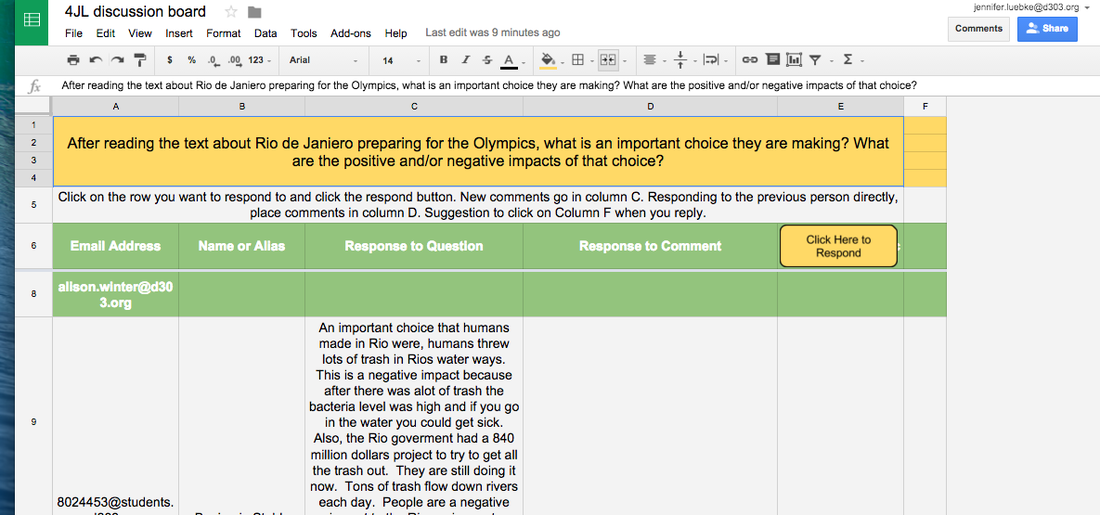
 | Today, I am home with my sick baby. Double ear infection and pinkeye. Yuck! Luckily, she is very content playing on her own, so I have been sitting on Pinterest for a greater part of the morning. It started with some healthy meals, some exercise plans, and then made my way to using technology in the classroom. I came across this great blog at alicekeeler.com about using Google Sheets as a discussion board. It’s fantastic because she already created this template for you and you just need to make a copy to use in your classroom! She goes through step by step with visuals. I suggest checking it out if you are interested! For the last 3 weeks my students have had their Erin’s Law lessons with the social worker, so our Monday morning meetings have been on Google Classroom so all students could share at the same time and still have the opportunity to respond/react to a few of their classmates. After students each made their own post and then replied to several posts, I would have a long thread of unnecessary things on the Google Classroom feed. This is why I found this blog to be intriguing. First Attempt: I warned students multiple times that this was our first time trying this. A few things I noticed:
Second Attempt:
|
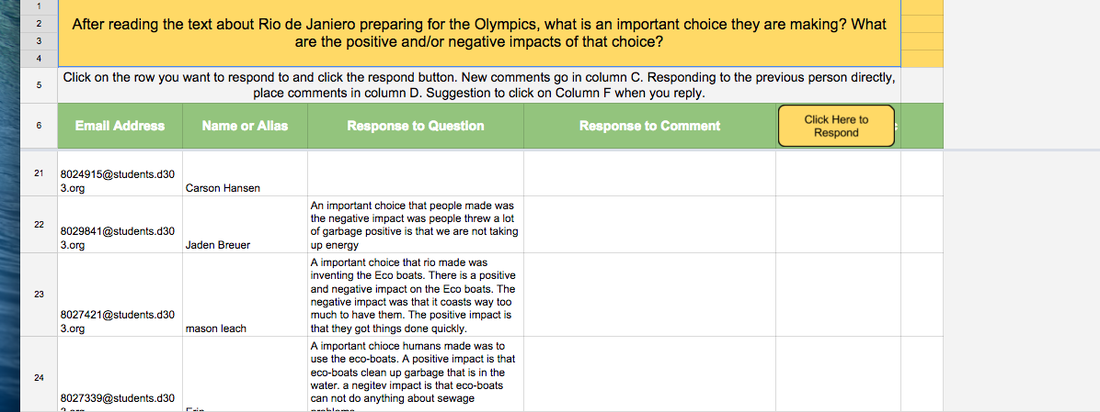
**New learning: At first, I thought other students would be able to respond to each other's comments in the “response to comments” column, however, I learned that only the teacher can respond to the student’s comments. Since I am not the creator or this script I contacted Alice Keeler to see if that was even a possibility. I will keep you posted on my findings.
Overall, I am going to continue to play with this script because I think it has a lot of potential!
Overall, I am going to continue to play with this script because I think it has a lot of potential!

Our students are spending time learning the parts of a water cycle. Jenny shared the Study Jams video on the water cycle. As you may begin to notice, we collaborate and share our goodies a lot! I’m not sure what I would do without her. This video did a great job of describing the parts of the water cycle. I loved having the students watch the video independently on the chromebooks. They were able to go back and rewatch parts they were confused about or pause in order to jot down notes. This group of students tends to struggle to remain engaged in whole class lessons. The simple act of holding the video in their hands, and listening to it on the own personal headphones really supports the engagement. If you have the opportunity, check out your iPads, or computers to watch your next video. I bet you’ll see an improvement in their engagement and comprehension of the content.
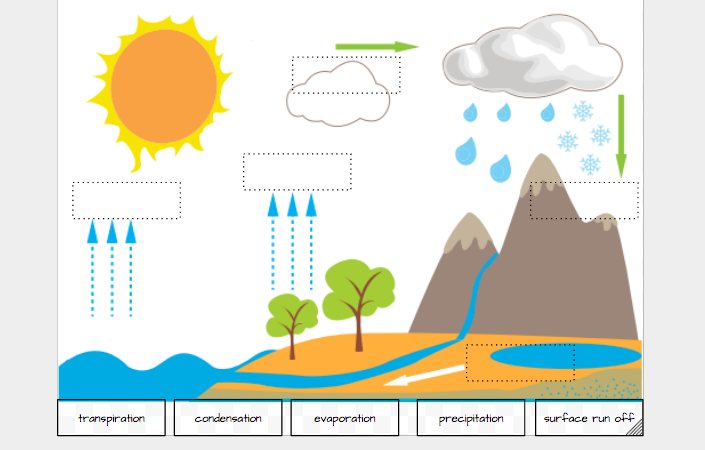
After watching the video I need my students to work on identifying the parts of the water cycle correctly. Instead of giving the students a paper diagram, I decided to make the lesson more Googly. I was extremely excited to play around with Google Drawing. I kept hearing great things about the versatility and application it a classroom. This was an Google App that didn’t work on the iPad so I had not yet explored it. It does work beautifully with Chromebooks though, so armed with a cart of Chromebooks, a PDF of the a Water Cycle diagram (thanks to Itsy Bitsy Fun) my students hit up Google Drawing. The simply drag and dropped the water cycle labels to the corresponding location on the diagram. My students found this to be a fun and easy to use application. They were able to easily manipulated the images and text boxes. One additional benefit of this is they can scramble the terms up and repeat as many times as they want as a study tool.

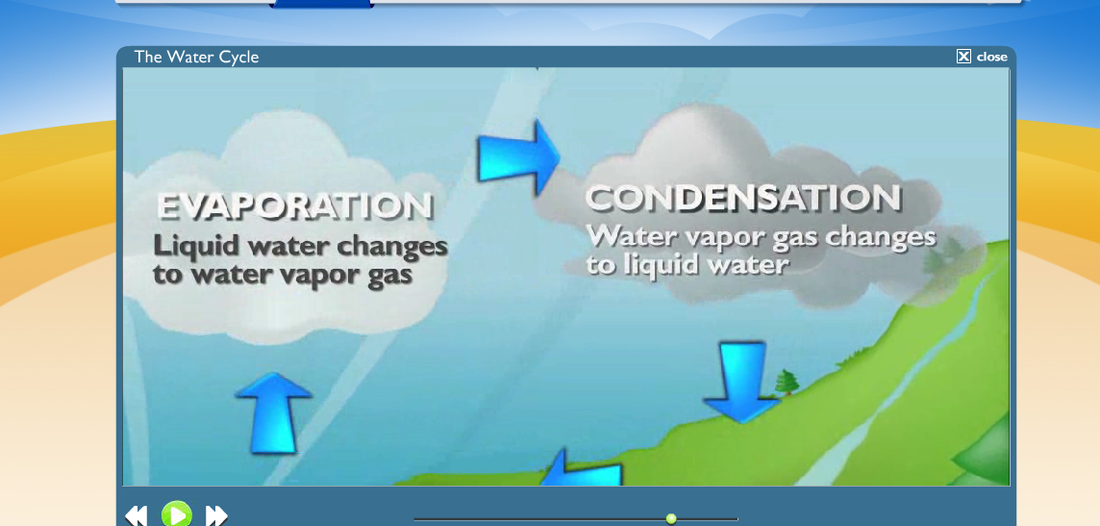
Today we started learning about the water cycle. Not too long ago, I came across a great resource for science…… It’s Scholastic Study Jams. Have you ever heard of them? If not, you’re missing out! I love these videos so much more than BrainPop because they seem less corny and much more informative (in my opinion). My students would agree! Click here for the video I showed my kids.
As Elizabeth mentioned in a previous post, our school is lucky enough to have 1:1 iPads, but also be piloting the ChromeBooks. Sadley the Study Jams don’t work on the tablet, so I have just showed the videos whole class in the past. This time, I checked out the Chromebooks, so the students could individually watch the video. This was great because during the video the students needed to record notes about each of the stages and then they had to complete a “Water Cycle Diagram.” Student could watch the video as many times as they needed and/or pause to jot down notes. This assignment was shared with students through Google Classroom. How did we ever teach without Google Classroom?! With just a few clicks I can instantly have copies of a document for each student, that already has their name on it AND I don’t have to carry the papers around in my teacher bag! It’s been a lifesaver.
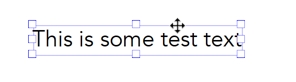
Anyway, the “Water Cycle Diagram” was created in Google Drawing. Elizabeth and I were looking for a way to use Google Drawing in the classroom and while researching Google Apps for Education we came across a blog that talked about using Google Drawing to create a venn diagram and students arranged the ideas accordingly. So, Elizabeth was so kind enough to create this diagram below for students to identify the parts of the water cycle. All they needed to do was move the text boxes at the bottom to the appropriate place in the picture. Given that this was the first time students were using this type of document, most did well. I did need to explicitly teach them how to move the text boxes and not adjust the text boxes. They needed to hover the cursor over the text box until it show the 2 perpendicular arrows. See example below:
As Elizabeth mentioned in a previous post, our school is lucky enough to have 1:1 iPads, but also be piloting the ChromeBooks. Sadley the Study Jams don’t work on the tablet, so I have just showed the videos whole class in the past. This time, I checked out the Chromebooks, so the students could individually watch the video. This was great because during the video the students needed to record notes about each of the stages and then they had to complete a “Water Cycle Diagram.” Student could watch the video as many times as they needed and/or pause to jot down notes. This assignment was shared with students through Google Classroom. How did we ever teach without Google Classroom?! With just a few clicks I can instantly have copies of a document for each student, that already has their name on it AND I don’t have to carry the papers around in my teacher bag! It’s been a lifesaver.
Anyway, the “Water Cycle Diagram” was created in Google Drawing. Elizabeth and I were looking for a way to use Google Drawing in the classroom and while researching Google Apps for Education we came across a blog that talked about using Google Drawing to create a venn diagram and students arranged the ideas accordingly. So, Elizabeth was so kind enough to create this diagram below for students to identify the parts of the water cycle. All they needed to do was move the text boxes at the bottom to the appropriate place in the picture. Given that this was the first time students were using this type of document, most did well. I did need to explicitly teach them how to move the text boxes and not adjust the text boxes. They needed to hover the cursor over the text box until it show the 2 perpendicular arrows. See example below:
This is an example of the diagram each student was assigned.
I enjoyed using this Google feature and I am still left wondering what ways we can use Google Drawing in the classroom in a very purposeful way.
Author
My name is Elizabeth, I am a mother of 3 boys, and a 4th grade teacher of Math and Science. I teach at 1 to 1 Chromebook school and love to innovate in order to reach my students.
Archives
November 2017
October 2017
April 2016
March 2016
February 2016
 RSS Feed
